
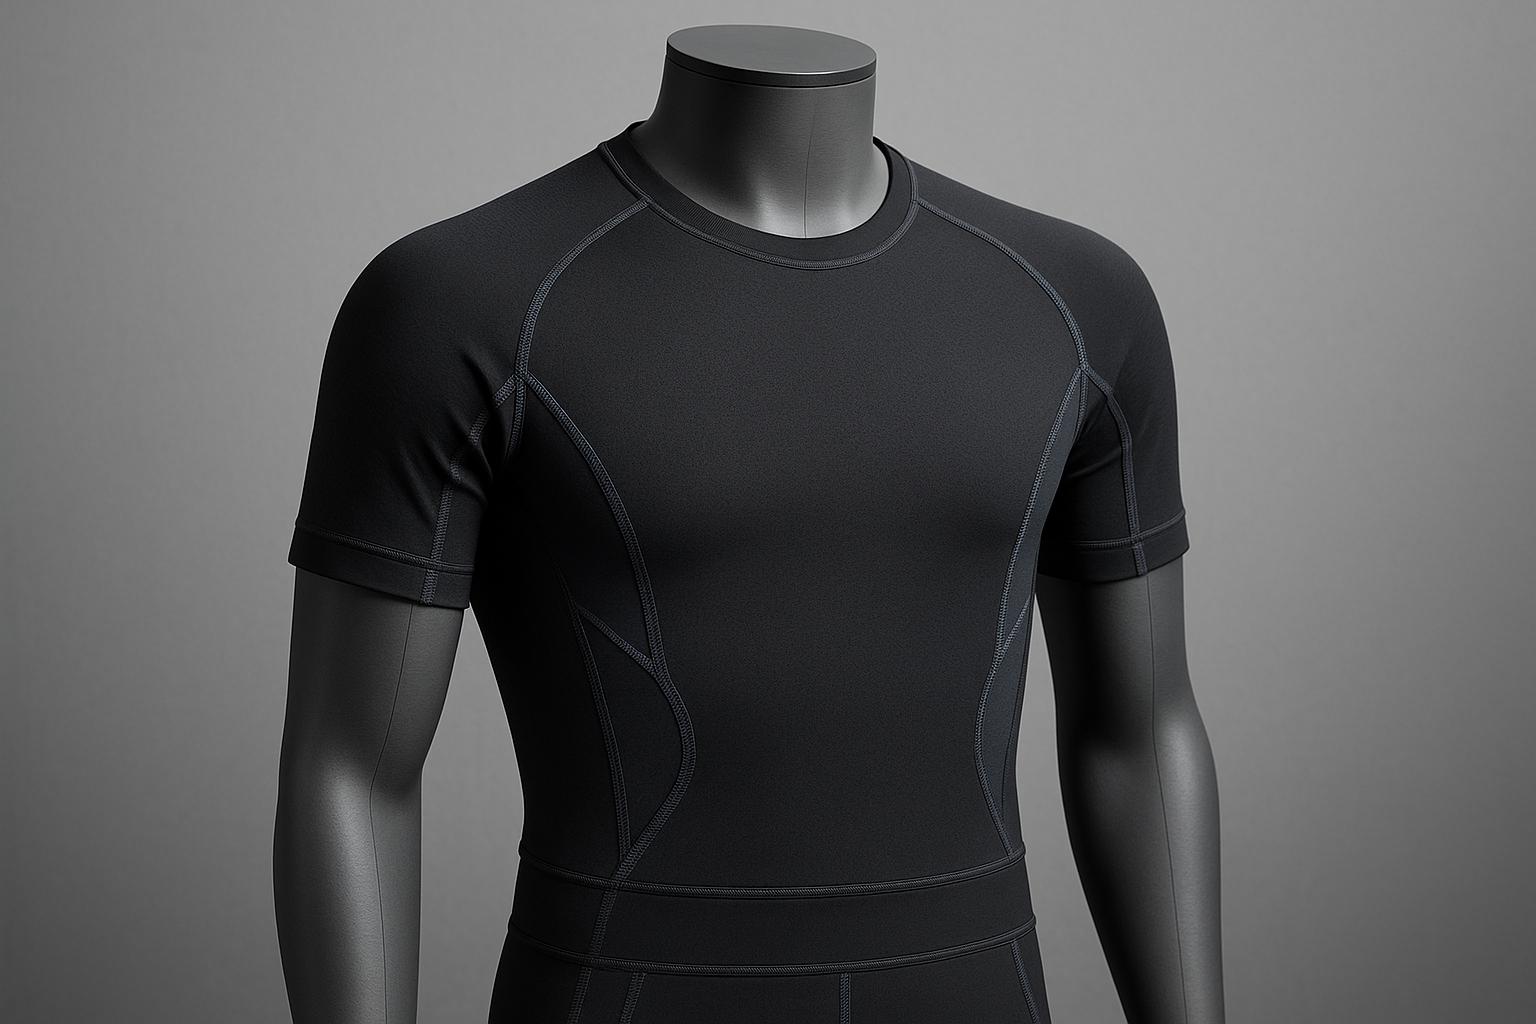
When designing activewear, testing fit during prototyping is vital to ensure comfort, functionality, and durability. Poor fit can lead to issues like restricted movement, discomfort, or fabric failures, which often result in customer returns. To avoid these problems, follow a structured process:
- Start with precise measurements: Use fit tolerances of ±0.5 inches for most garments and ±0.25 inches for waistbands. Tools like graded spec sheets, tech packs, and fabric stretch testers are essential.
- Conduct static and dynamic fit tests: Check fit on models in neutral positions, then simulate movements like squats, lunges, and stretches to assess performance.
- Use production-quality materials: Prototypes must match final fabric specs to ensure accurate results.
- Perform wear and wash tests: Evaluate how garments hold up over time, including after multiple washes, to identify issues like shrinkage, pilling, or loss of support.
- Collaborate with experienced manufacturers: Their expertise in activewear construction can reduce errors and streamline the prototyping process.
This method ensures activewear meets user expectations for comfort, mobility, and durability, reducing costly revisions and returns.
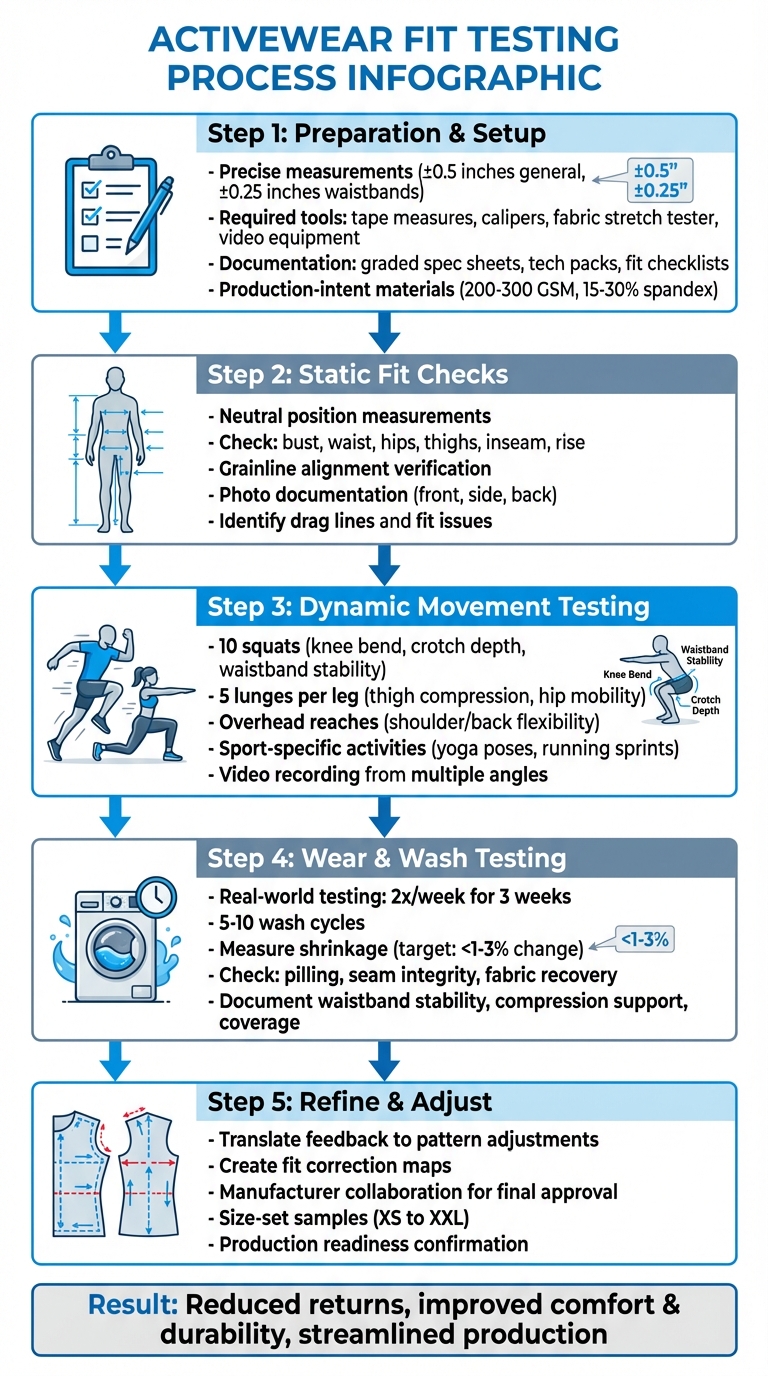
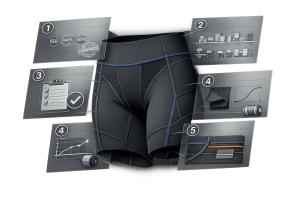
5-Step Activewear Fit Testing Process for Prototyping
I Found the Secret to Perfect-Fitting Activewear (6 Simple Fixes!)
Preparing for Fit Testing: Tools, Materials, and Documentation
Getting ready for fit testing is crucial long before a prototype ever reaches a fit model. Without the right tools, materials, and documentation, the process can easily become a guessing game, leading to wasted time and repeated revisions. By establishing a clear framework upfront, you can streamline the process and avoid unnecessary setbacks.
Required Tools and Documentation for Fit Testing
To properly conduct fit testing, you’ll need a well-equipped toolkit. Include items like flexible tape measures, straight rulers, digital calipers, a fabric stretch tester (or marked board), dress forms or mannequins, and video/photo equipment to capture how garments behave during testing. A fabric stretch tester is especially important for determining elongation percentages.
Documentation is just as critical. Start with a graded spec sheet that lists all key measurements – such as bust, hip, thigh, inseam, rise, and garment lengths – using inches to align with U.S. standards. Pair this with a tech pack, which should detail fabric composition, weight, stretch direction, and seam types, all of which are essential for accurate fit testing. Additionally, create a fit checklist. This should cover stress points specific to activewear, like waistband grip, crotch depth, knee articulation, shoulder mobility, and hem stability, as well as outline movements to test (e.g., squats, lunges, overhead reaches, running, and yoga poses). A standardized fit session form will help you document measurements, compare them against specs, and note any discrepancies (e.g., "+0.5 inches at hip vs. spec"). Use it to also record subjective observations, such as a waistband that feels uncomfortable when bending.
For professional-level testing, some labs use trained fit models and advanced 4D scanners to assess how garments perform during movement. These tools and documents are essential for feeding into the iterative prototyping and testing process.
Using Production-Intent Materials for Accurate Results
To get reliable fit data, prototypes must be made with production-intent materials. Substituting fabrics during prototyping can lead to misleading results, as even small differences in stretch recovery, compression, drape, or seam behavior can throw off the final fit.
For activewear, this means using fabrics like polyester-nylon blends with 15–30% spandex at 200–300 GSM. Request swatches from your manufacturer and evaluate them for critical factors such as stretch recovery, pilling resistance (using tests like the Martindale method), and dimensional stability (ensuring shrinkage stays under 1% after washing). Stick to the same seam constructions planned for the final design. Research has shown that fabric properties like tensile strength, bending, shear, and surface friction directly influence how garments drape and compress, making it vital to use materials that match your production specs.
Document everything – supplier details, test results, and baseline measurements – in your tech pack. While production-intent materials may increase prototype costs, they save time in the long run by reducing the need for re-fitting once final fabrics are introduced.
Working with Experienced Manufacturers
Once you’ve got the right tools and materials in place, collaborating with a specialized manufacturer can take your prototypes to the next level. Manufacturers that focus on activewear bring a deep understanding of the unique challenges involved, such as stretch patterning, gusset design, and seam construction. This expertise can significantly reduce the number of prototype iterations needed. In contrast, generic factories may miss these nuances, leading to issues like ride-up or restricted movement.
Take New Dong Huang Garment Co., Ltd. as an example. With over 27 years of experience in performance wear, their team uses advanced techniques like bonding, laser cutting, and seamless construction to create production-ready samples. As they explain:
"Our global design team… Chinese team excels at transforming concepts into high-quality, tangible samples with precision and efficiency."
This level of expertise allows them to anticipate potential fit issues before they arise, which minimizes the number of sample rounds required.
Specialized manufacturers also provide early access to production-intent materials, including options like eco-friendly fabrics, quick-dry blends, and anti-odor treatments. They can assist with tailored graded spec sheets, create detailed tech packs, and offer guidance on pattern adjustments based on fit feedback. This collaborative process ensures your prototypes not only meet design expectations but also reflect the performance of the final garment.
Conducting Fit Sessions
Once everything is set up and ready, it’s time to test your prototype. Fit sessions are where your design meets reality, giving you a clear picture of how the garment performs. This process involves both static checks – evaluating the fit while the model is standing still – and dynamic testing, which simulates movement during real-life activities. Both are crucial, especially for activewear, where performance hinges on how the fabric responds to motion. Start with static evaluations before moving into movement-based tests.
Static Fit Checks: Measurement and Alignment
The first step in any fit session is a static check. Place your prototype on a fit model who stands in a neutral position with their arms relaxed at their sides. This neutral stance allows you to compare the garment’s measurements against the specifications in your tech pack. Use a flexible tape measure to check key areas like the bust, waist, hips, thighs, inseam, and rise, with a typical tolerance of +/- 0.5 inches for most areas and +/- 0.25 inches for waistbands.
Pay close attention to grainline alignment. Seams should run parallel to the fabric’s grain to avoid distortion or twisting, which can be especially problematic for high-stretch garments like leggings. Misalignment can cause discomfort and an unprofessional look, as the fabric may spiral around the body. Look for drag lines – wrinkles or pulls in the fabric that indicate fit issues. Horizontal drag lines often mean the garment is too tight, while vertical lines suggest there’s excess fabric.
Take photos of the garment from the front, side, and back to document your findings. Note any deviations from the intended specifications, such as “hip measurement +0.75 inches vs. spec” or “horizontal drag lines across the upper thigh.” These observations will guide your next round of pattern adjustments.
Dynamic Movement Testing for Activewear
Static checks only give you part of the picture. Activewear must also perform during movement, making dynamic testing essential. Create a movement routine that mirrors how the garment will be used by your target customer. For bottoms like leggings, start with 10 squats to assess knee bend, crotch depth, and waistband stability. Follow this with 5 lunges per leg to evaluate thigh compression and hip mobility. For tops, include movements like arm raises and overhead stretches to test shoulder and back flexibility. Repeat each exercise 3 to 5 times to identify recurring issues, such as waistband rolling or fabric riding up.
Incorporate sport-specific activities to get a more accurate assessment. For yoga wear, try poses like downward dog and warrior II to test flexibility. For running gear, include short sprints to check for seam integrity and fabric shifting.
Record the session on video from multiple angles. This can help you catch subtle problems, like fabric bunching at the knees during squats or gaping at the neckline during forward bends. If possible, use trained athletes as fit models – they can provide precise feedback on any restrictions they experience during movement.
Recording Observations for Fit Adjustments
After completing the dynamic tests, document your findings in detail. Use a standardized form that categorizes issues by type (e.g., alignment, drag lines, movement restrictions), body zone (like waist, shoulders, or crotch), and severity (mild, moderate, or critical). Be specific in your notes – for example, instead of writing “waistband issue,” say, “waistband rolls 2 inches during squats on size M model”.
Focus on the most pressing problems first. For instance, chafing at seams during sprints should be addressed immediately, while minor wrinkles at the hem can be a lower priority. Combine objective data – such as measurements, annotated photos, and video timestamps – with subjective feedback from the fit model. Comments like “feels tight across the shoulders when reaching overhead” or “fabric digs into the waist when bending” provide valuable context for adjustments.
Partnering with experienced manufacturers can make this process smoother. Their expertise ensures that prototypes are designed with production realities in mind, reducing the number of revisions needed before final approval. At New Dong Huang Garment Co., Ltd., we rely on thorough fit testing and meticulous documentation to create activewear that balances performance with comfort at every stage.
sbb-itb-8dbc09a
Wear Testing for Performance and Comfort
Dynamic fit sessions give you a snapshot of how a garment performs in the moment, but wear testing takes things a step further. It examines how well prototypes hold up over time and through real-life use. This phase is where you discover whether a design can withstand actual workouts, repeated washing, and multiple wears – all without losing its shape, support, or comfort. Problems like chafing, waistbands rolling down, or compression wearing out often only show up after extended use. That’s why wear testing is essential – it puts garments through the kind of challenges they’ll face in everyday scenarios. The feedback from these tests is invaluable for refining prototypes.
Setting Up Wear Tests for Accurate Feedback
The first step in wear testing is recruiting the right testers. Choose people who already participate in the activities your garment is designed for. Testing running leggings? Go for runners who hit the pavement at least three times a week. Yoga wear? Seek out regular practitioners attending multiple classes weekly. Avoid asking people to try a new activity just for the test – you want feedback from folks who know what good performance feels like.
Diversity matters too. Your test group should reflect your target market in terms of age, body type, and size range. Match testers to specific activities like road running, HIIT, studio workouts, or outdoor hiking to cover all use cases. Before the test, document key garment measurements – waist, hip, thigh, inseam, and length (in inches) – so you can track any changes over time.
Provide testers with clear guidelines. For example, you might ask them to wear the garment twice a week for three weeks, during activities lasting 30 to 90 minutes. Use a standardized feedback form with a rating scale (e.g., 1 to 5 or 1 to 10) to evaluate comfort, breathability, moisture management, support, and range of motion. Open-ended questions should cover specific issues like chafing, pressure points, or fabric riding up. Don’t forget environmental factors – ask testers to note whether they were indoors with air conditioning or outdoors in 85°F heat, as temperature can impact fabric performance. Stick to U.S. measurements – height in feet and inches, weight in pounds – and reference familiar activities like treadmill running, CrossFit, or spin classes.
Evaluating Functional Fit in Real-World Scenarios
Wear testing focuses on how garments perform during movement. For waistband stability, runners and HIIT participants should log whether the waistband slides, rolls, or gaps during high-impact moves, noting how long into the workout the issue occurs. For compression support, testers evaluate how the fabric supports their body during motion and flag any areas that feel overly tight, such as behind the knees or across the bust in sports bras. While lab tests can measure breast movement reduction in sports bras, wear tests rely on how testers perceive bounce and support across low, medium, and high-impact activities.
For yoga and studio workouts, coverage and mobility are key. Testers should perform deep squats, lunges, and overhead stretches to see if the fabric stays opaque when stretched and whether tops ride up, exposing the midriff. Outdoor gear requires different checks – testers should wear the garment under jackets or over base layers, paying attention to fit around the shoulders, hips, and knees, especially when carrying backpacks. After each session, encourage testers to jot down activity type, start and end times, and comfort ratings at both the beginning and end of the workout. This helps identify any changes over time.
Assessing Post-Wash Fit Performance
Once movement and comfort are evaluated, it’s time to test how well the garment holds up after repeated laundering. Create a home-based washing protocol that mirrors how U.S. customers care for their activewear. Use standard household machines – either top-load or front-load – with cold or warm water on a gentle or normal cycle. Drying should follow care label instructions, whether that’s tumble drying on low or line drying. To ensure consistency, all testers should use the same detergent type, load size, and machine settings. Run each garment through 5 to 10 wash cycles, then re-measure key points like the waist, hip, inseam, and length (in inches). Calculate any shrinkage or stretching; most brands aim to keep changes within 1 to 3% in critical areas.
Inspect the garments for signs of wear. Check seams for popped stitches, seam grinning, or tape coming loose. Ask testers to note if the fit feels tighter, looser, or if parts like legs or sleeves twist. You can also test recovery by marking a reference line with tape, stretching the fabric about 25–30% beyond its resting length, and seeing if it snaps back to the original mark. Persistent stretching indicates poor recovery. Look for pilling in high-friction areas like the inner thighs, underarms, and side seams, and see if prints or logos crack, peel, or fade. A quick squat test in front of a mirror can confirm whether the fabric stays opaque or becomes sheer after multiple washes.
New Dong Huang Garment Co., Ltd. uses wear test feedback to fine-tune designs. For instance, if multiple testers report waistband issues, adjustments might include changing the rise height, waistband depth, or elastic tension. Chafing along inner-leg seams? Switching to flatlock or bonded seams or repositioning the seam line could solve the problem. If support diminishes, options include increasing fabric weight (GSM), adding more elastane, incorporating power mesh panels, or modifying the knit structure in key areas. With over 27 years of experience crafting performance leggings, sports bras, and technical apparel for global brands, New Dong Huang offers tailored solutions – whether that’s fabric upgrades, alternative stitching, or reinforcement techniques – to address real-world feedback while balancing performance and cost.
Refining Prototypes: Analyzing Fit Data and Making Adjustments
Once feedback is collected from static checks, dynamic tests, and wear trials, the next step is converting that data into precise pattern changes. This phase bridges the gap between identifying issues and creating a garment ready for production. The aim is to take testers’ experiences – like a waistband slipping during burpees or leggings feeling tight behind the knees – and translate them into exact adjustments. Each iteration targets specific fit problems uncovered in earlier testing rounds. Here’s how to turn those observations into actionable pattern updates.
Translating Fit Feedback into Pattern Adjustments
Start by organizing feedback by problem area – waistband, rise, armhole, bust, and so on – and adjust the patterns accordingly. For example:
- If testers report gaping at the crotch, increase the front rise by 0.5–1 inch.
- A rolling waistband? Raise its height by 0.25–0.5 inches.
- Restricted arm mobility? Adjust the armhole depth by 0.25 inches.
- For sports bras that feel too tight across the bust, widen the bust panel by 0.5 inches and add subtle darting for support without squeezing.
These changes typically follow standard fit tolerances: ±0.5 inches for general areas and ±0.25 inches for more critical zones like waistbands. If testers experience inner thigh binding during squats, measure the strain on the prototype – such as a 1-inch fabric pull – and add 0.5 to 1 inch of ease to the inseam curve or redesign the crotch gusset to improve movement. After making these adjustments, retest using a new sample made from production-intent fabric to ensure the changes work across various body types and activities.
Creating a Fit Correction Map
A fit correction map is a visual tool that captures every adjustment needed. Use pins to mark excess fabric, such as pinching and folding 1-inch sections at the waist to show where reductions are required. Tailor’s chalk can be used to draw new seam lines, like a higher waistband curve or reshaped armhole. Temporary additions, like gussets for leggings or extended panels for sports bras, can be outlined with removable tape.
Photograph or scan the marked garment from multiple angles – front, back, and sides – and include measurements directly on the images. For instance, label areas like "add 0.75 inch to armhole depth at the shoulder" or "reduce waist circumference by 1 inch." Overlay these photos onto your digital pattern using tools like CLO3D for greater accuracy. Don’t forget to include notes on post-wash changes; for example, if shrinkage tests show a 3% reduction in the inseam, adjust the pattern to account for this before production. This map becomes the go-to reference for final adjustments during manufacturer reviews.
Working with Manufacturers for Final Fit Approval
Once the fit correction map and revised tech pack are ready, collaborate with experienced manufacturers to finalize fit standards and ensure consistency during bulk production. Share the correction map digitally and schedule joint fit sessions – either online or in person – with models representing your target size range. Request size-set samples (e.g., XS to XXL) to compare measurements against your specifications. Follow this with detailed wear and wash tests to confirm the adjustments hold up over time.
New Dong Huang Garment Co., Ltd. excels in activewear prototyping, turning fit feedback into high-quality samples with precision. Their skilled design team uses advanced tools like bonding machines, laser cutters, and ultrasonic machines to handle intricate pattern changes. With a dedicated Quality Control team and a 99% on-time delivery rate, New Dong Huang ensures fit standards are consistently upheld from the first sample to full-scale production, balancing performance, comfort, and cost in every piece.
Conclusion
A well-executed prototyping and testing process is the backbone of creating successful activewear. It’s not just about taking measurements – it’s about ensuring the garments perform as intended in real-life scenarios. The process starts with careful preparation and thorough testing. Static fit checks confirm measurements and alignment, while dynamic movement testing evaluates how the clothing holds up during stretching, bending, and intense physical activity. Wear tests go a step further, assessing how the garments perform during actual workouts and after washing, ensuring they maintain their fit and functionality over time. The final step, refining prototypes, involves using feedback to adjust patterns, create fit correction maps, and secure manufacturer approval before moving into production.
Partnering with skilled manufacturers adds another layer of precision to the process. Their expertise in craftsmanship, advanced fabric technologies, and extensive knowledge reduces the need for repeated iterations, streamlining the prototyping cycle. This attention to detail prevents issues like restricted movement, improper sizing, or fabric failures, which can be costly down the line.
For instance, New Dong Huang Garment Co., Ltd. exemplifies this approach by combining over 27 years of experience with cutting-edge manufacturing techniques. Their global design team uses advanced tools like bonding machines and laser cutters to transform concepts into accurate samples. Backed by a dedicated Quality Control team and a 99% on-time delivery record, they ensure every piece meets the highest standards for performance, comfort, and durability. From prototype to full-scale production, their commitment to quality ensures activewear that excels in mobility, comfort, and long-lasting durability.
FAQs
How can I make sure my activewear prototypes meet final production standards?
To make sure your activewear prototypes meet the standards of final production, begin with thorough fit tests. These tests should focus on comfort, performance, and how well the garment functions during use. Pay close attention to how the fabric performs – check its stretch, durability, and breathability during wear trials. Use this feedback to tweak patterns or adjust construction details as necessary.
Work closely with skilled manufacturers who specialize in advanced techniques like bonding or laser cutting. Ensure they follow strict quality control measures throughout the process. Continuously compare your prototypes with final samples to spot and fix any inconsistencies, guaranteeing a smooth shift to full-scale production.
How can I test the fit of activewear during prototyping?
To evaluate activewear fit during prototyping, focus on how it performs during dynamic movements. Test the garment by observing how it handles actions like bending, stretching, running, and jumping. Watch closely to see if the fabric stretches and recovers properly, ensuring it offers both flexibility and support without sagging or limiting motion.
Pay special attention to critical areas such as seam placement, waistband stability, and overall comfort during these movements. If issues arise, make adjustments to the fabric tension, seam alignment, or pattern design to address any discomfort or performance concerns. This hands-on process ensures the activewear is designed to handle real-world activities while providing a comfortable, reliable fit.
Why should you use production-intent materials when prototyping activewear?
Using the actual materials planned for production during prototyping is crucial for achieving a garment that fits, performs, and feels as intended. These materials help you evaluate how the fabric will behave in practical use – whether it’s stretch, durability, or breathability.
When you prototype with production-ready materials, you can fine-tune the design and construction with accuracy. This approach minimizes potential problems during large-scale manufacturing and ensures the finished product aligns with your quality and functionality goals.