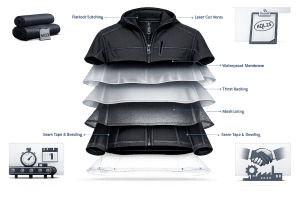

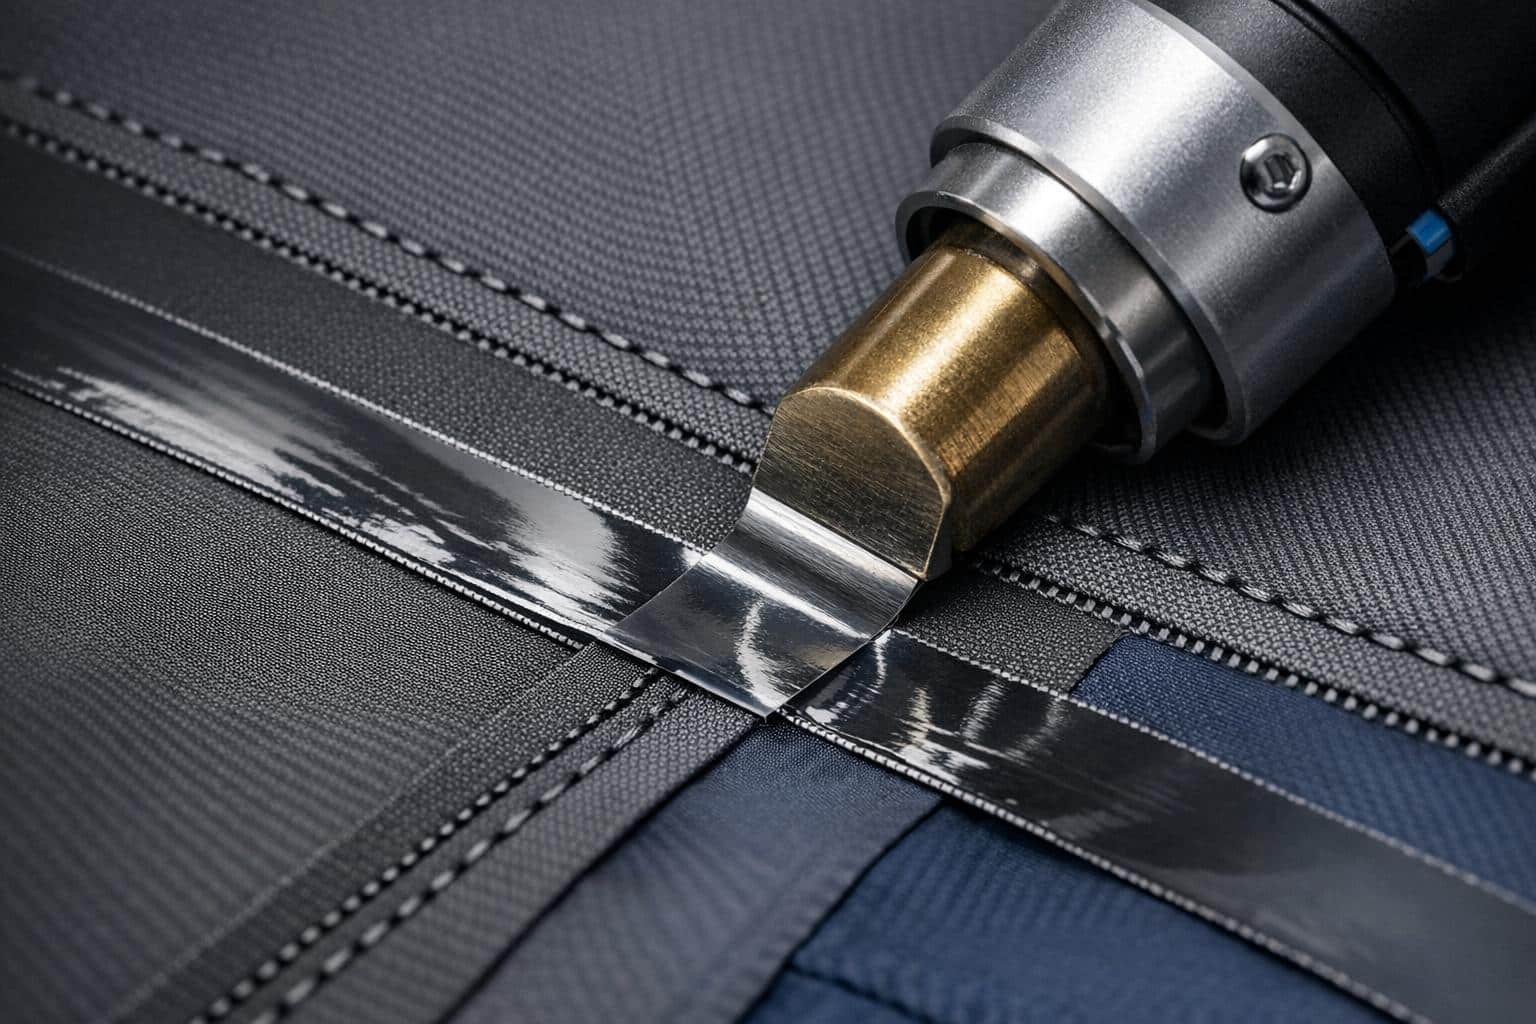
Seam taping is the process of sealing needle holes in garments to make them waterproof. This involves applying a heat-activated adhesive tape over seams to block water from passing through. It’s essential for waterproof jackets, especially in wet conditions, as even the best fabrics can fail at the seams.
Key Takeaways:
- Why it’s important: Needle holes from stitching allow water to seep through. Seam taping prevents this, ensuring garments are waterproof.
- Types of seam taping: Fully taped (all seams sealed) for maximum waterproofing or critically taped (only key areas sealed) to balance cost and breathability.
- Choosing the right tape: Match tape type (2-layer or 3-layer) to your fabric. PU-coated fabrics require specific tapes, while silicone-coated fabrics need liquid sealants.
- Tools needed: For DIY, use a household iron or mini craft iron with parchment paper. For large-scale production, specialized seam-sealing machines are used.
- Application steps: Clean seams, trim allowances, cut tape, apply heat and pressure, and inspect for defects.
Properly applied seam tape ensures jackets stay watertight, whether for DIY repairs or industrial production. Regular maintenance, like cleaning and reapplying waterproof treatments, can extend the tape’s lifespan.
Preparation and Key Concepts for Seam Taping
Critically Taped vs. Fully Taped Seams
When it comes to seam taping, you’ll need to decide between fully taped seams and critically taped seams. Fully taped seams are covered entirely with waterproof tape, ensuring that every seam in the garment is as water-resistant as the fabric itself. This level of protection is a must for extreme wet conditions or professional-grade outdoor gear where complete waterproofing is non-negotiable.
On the other hand, critically taped seams focus only on areas most exposed to water, such as the hood, neck, and shoulders. This approach reduces manufacturing costs and improves breathability while still offering protection where it’s needed most.
"Taped seams are an important part of any waterproof product, they’re one of the core features that determines whether a product can actually be labelled as fully waterproof".
Once you’ve chosen the seam type, the next step is selecting the right tape for your fabric and intended use.
How to Choose the Right Seam Tape
Picking the correct seam tape depends on your fabric type and coating. For instance, PU-coated fabrics require heat-activated tape that’s compatible with polyurethane, while silicone-coated fabrics (like silnylon) don’t bond well with standard tapes. Instead, they need liquid silicone sealants for proper sealing.
Here’s a quick breakdown of tape types:
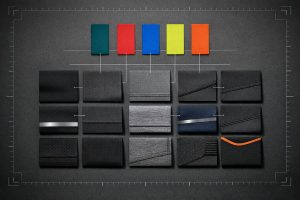
- 2-layer (2L) tape: Ideal for 2-layer waterproof fabrics. It’s typically translucent and bonds well with these materials.
- 3-layer (3L) tape: Designed for 3-layer garments, this tape has a fabric backer to match the interior and a thicker adhesive layer to handle the porous surface of 3-layer laminates.
"Seam tape for three-layer materials is special as it also has a fabric layer to protect the tape and reduce friction. The adhesive layer is also thicker so it fills the more porous inner surface of 3-layer fabrics".
For straight seams, use tape that’s 0.8–1 inch (20–25 mm) wide. When working on curved seams, opt for thinner tape or make small clips along the edges to help it lay flat.
Tools and Equipment Needed for Seam Taping
Once you’ve picked the right tape, gather the tools you’ll need for application. Your choice of tools will depend on the scale of your project – whether it’s a DIY repair or part of a larger manufacturing process.
For smaller projects or prototyping, a household iron set to the correct temperature works well. Use 176°F for 2L tape or 257°F for 3L tape. A mini craft iron, such as the Dritz Petite Press, is also a great option for precision work. To prevent the adhesive from sticking to the iron, use a protective barrier like parchment paper, baking paper, or thin cotton muslin. Support your work on a hard table layered with muslin or use an ironing board. For curved seams, a tailor’s ham or a rolled towel can help maintain the garment’s shape.
For industrial-scale projects, specialized seam-sealing machines are the go-to tools. These machines apply thermoplastic tape with precise heat and pressure, ensuring consistent results. Hydrostatic head testing machines are often used afterward to confirm the waterproofing performance.
Before applying the tape, trim seam allowances to about 1/4 inch (6 mm) so the tape extends beyond the stitching on both sides for a secure seal. Clean the fabric surface with isopropyl alcohol or acetone to remove any oils or residues that might weaken the adhesive bond.
| Equipment Type | Heat Source | Pressure Application | Best Use Case |
|---|---|---|---|
| DIY / Small-Scale | Household iron or mini craft iron | Manual hand pressure | Prototyping, repairs, MYOG projects |
| Industrial | Hot-air seam sealing machine | Automated pneumatic or mechanical pressure | Mass production, professional manufacturing |
With the right tools and preparation, you can create durable, waterproof seams that stand up to the elements.
sbb-itb-8dbc09a
How to seal seams using tape or glue
How to Apply Seam Tape: Step-by-Step Process
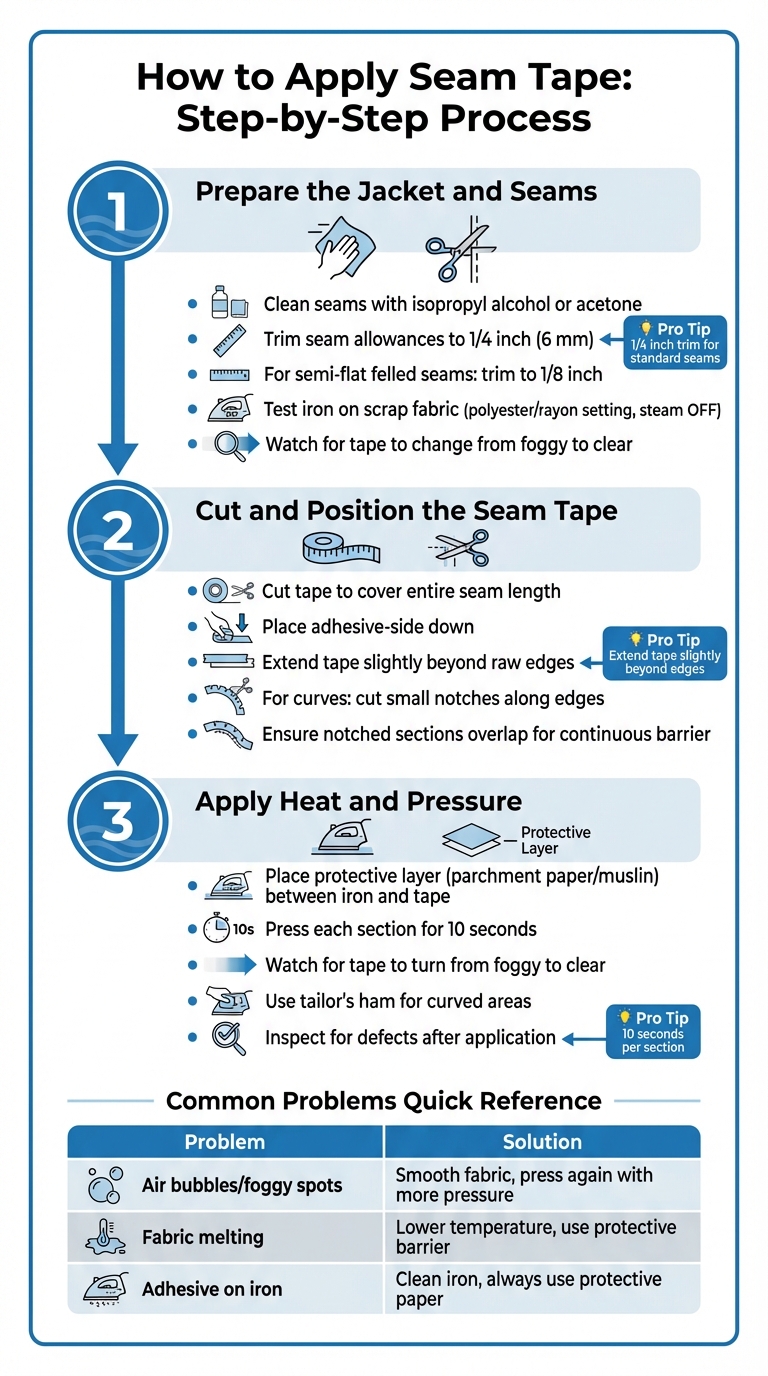
Seam Taping Application Process: 3-Step Guide for Waterproof Jackets
Step 1: Prepare the Jacket and Seams
Start by cleaning the seams with isopropyl alcohol or acetone to remove any residue. Trim the seam allowances to 1/4 inch (about 6 mm). For semi-flat felled seams, go even smaller – 1/8 inch. Make sure the fabric lies completely flat. For curved sections, use a tailor’s ham or a rolled towel to provide support.
Before you begin applying the tape, test your iron on a scrap piece of fabric. Set it to the polyester/rayon setting with the steam turned off. The adhesive activates when the tape changes from foggy to clear. Once you’ve confirmed the temperature, you’re ready to move on.
Step 2: Cut and Position the Seam Tape
Cut the seam tape to the length you need, ensuring it fully covers the stitching, needle holes, and the entire seam allowance. Place the tape adhesive-side down, letting it extend slightly beyond the raw edges for complete coverage. For tight curves, cut small notches along the edge of the tape so it lays flat without bunching.
Make sure the notched sections overlap slightly to maintain a continuous waterproof barrier. If the seam you’re taping will later be sewn into another seam, trim the tape just short of the fabric edge to avoid creating extra bulk where seams intersect.
Step 3: Apply Heat and Pressure
Place a protective layer – parchment paper, printer paper, or thin cotton muslin – between the iron and the tape. Then, press each section for about 10 seconds. Watch for the tape to turn from foggy to clear, signaling that the adhesive has melted and bonded to the fabric. For curved areas, keep the garment positioned on your tailor’s ham or rolled towel while pressing. If you’re working on a large jacket, it can be easier to tape each seam right after sewing instead of waiting until the entire garment is finished.
Once the tape is applied, inspect your work for any issues and make corrections as needed.
Fixing Common Seam Taping Problems
After pressing, carefully check the tape for any defects. Use this table to identify and resolve common issues:
| Problem | Likely Cause | Solution |
|---|---|---|
| Air bubbles, foggy spots, wrinkles | Not enough heat or pressure, or fabric not flat | Smooth the fabric and press again, applying even pressure for a few extra seconds. |
| Fabric distortion or melting | Iron temperature too high | Lower the iron’s temperature and always use a protective barrier between the iron and tape. |
| Adhesive on the iron | No protective barrier used | Clean the iron thoroughly and always place parchment paper or muslin between the iron and tape. |
If the tape doesn’t stick at all, it’s likely the surface wasn’t cleaned well enough, or the wrong side of the tape was applied to the fabric. Clean the area again with isopropyl alcohol and double-check that the adhesive side of the tape is facing the fabric before reapplying.
Quality Control and Durability
Testing Waterproof Performance
Start by visually inspecting the seam tape. It should look clear, smooth, and firmly bonded to the fabric. If you notice white, foggy, or peeling sections, these are signs of issues. To confirm its effectiveness, try a field test – wear the gear in the rain or spray it with a hose to check for any moisture penetration .
For a more precise evaluation, hydrostatic head testing measures the water pressure the material can resist. To meet waterproof standards, seam tape must endure at least 3 PSI (or 1,500 mm) of continuous water pressure. Additionally, most outdoor gear requires a Moisture Vapor Transfer rating between 10,000 and 20,000 g/m² to ensure a balance between waterproofing and breathability.
Once waterproofing is confirmed, regular maintenance is key to preserving the seam tape’s durability over time.
Maintaining Seam Tape Over Time
Seam tape can degrade over time due to exposure to oils, sweat, sunscreen, and dirt. To keep it in good condition, wash your gear with a specialized tech wash designed for synthetic outdoor materials. Avoid regular detergents, as they can damage the waterproof barrier. After washing, tumble dry on low heat for about 10 minutes (if the care label allows) to reactivate the Durable Water Repellent (DWR) coating and reinforce the adhesive bonds.
For heavy users, inspect and reapply waterproof treatments every 4–6 months. If you use your gear less frequently, aim for maintenance every 6–12 months.
How to Repair Failed Seam Tape
If maintenance doesn’t prevent deterioration, you may need to repair the seam tape. Signs of failure include peeling or the tape turning foggy and white instead of clear. To fix small sections, clean the area with isopropyl alcohol to remove oils and residues . Then, use parchment paper and an iron set to about 300°F (150°C) for 10 seconds to reattach the tape .
For more extensive damage, remove the old tape entirely, clean the seams with isopropyl alcohol, and apply fresh seam tape using the same method. If the seams are on tight curves or have complex shapes, a liquid sealant like Seam Grip WP (approximately $9.95) can be a better option. Just note that liquid sealants require 8 to 12 hours to fully dry .
"If a small section of seam tape has peeled, use Seam Grip WP to reattach it. If the tape seems to be failing everywhere, remove it and discard, then clean the seams with isopropyl alcohol and re-seal." – Litesmith
Scaling Seam Taping for Production
Setting Standard Process Parameters
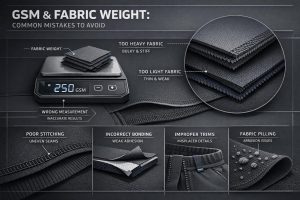
When ramping up production, having well-documented parameters is non-negotiable. Key variables like temperature, pressure, and dwell time must be recorded for each fabric-tape pairing. For instance, some technical fabrics can only withstand up to 300°F (150°C) without warping, while others require higher heat to properly activate adhesives.
Keep a master log that details these settings by fabric type. This way, when switching between materials like PU-coated nylon and 3-layer laminates, your team can quickly adjust to the right parameters. Surface preparation is equally critical – ensure seam allowances are consistent and, for tight curves, use small clips to help the tape adhere smoothly without gaps.
By standardizing these processes, you lay the groundwork for efficient production and seamless quality control.
Quality Control During Production
Once your production parameters are set, quality control becomes the next priority. Properly bonded tape will appear clear or translucent, while white or foggy areas signal incomplete adhesion. Train your quality control team to spot these issues early, preventing defects from impacting entire batches.
Hydrostatic head testing is essential for verifying waterproof performance. Use semi- or fully-automated machines to ensure seams meet the required 3 PSI (or 1,500 mm) water pressure standard. Reinforce seam intersections with extra patches for added durability. Additionally, make sure the production surface has a slight "give" (such as layered muslin) to help the tape conform to stitching without leaving air pockets.
Working with Professional Manufacturers
When scaling up, partnering with experienced manufacturers can make all the difference. As mentioned earlier, precise control over heat and pressure is critical, and professional manufacturers excel at maintaining these standards. New Dong Huang Garment Co., Ltd., for example, has over 27 years of experience in activewear manufacturing and is equipped with specialized seam taping machinery. Their technical team ensures fabric-tape compatibility to achieve watertight seams.
These manufacturers maintain detailed records of process parameters for various fabric types and conduct compatibility tests before full production begins. They also implement rigorous quality checks, including hydrostatic testing, to confirm waterproof performance throughout the production process. With a 99% on-time delivery rate and certifications like BSCI and Sedex, partnering with an established manufacturer ensures consistent quality and reliability, even at large production scales.
Conclusion
Seam taping transforms a standard sewn jacket into a waterproof barrier by sealing the tiny needle holes that would otherwise let moisture seep through. As we’ve discussed, choosing the right tape for your fabric, properly preparing the seams, and applying controlled heat and pressure are all crucial steps to ensure a watertight seal. To verify waterproofing, visual inspections and hydrostatic testing are key.
For smaller projects, a household iron can do the job, but larger-scale production requires specialized equipment. At New Dong Huang Garment Co., Ltd., we follow precise process parameters tailored to each fabric type, maintain strict quality control, and handle intricate challenges like seam intersections – common areas for potential leaks – with expertise.
"Applying a thermoplastic tape under heat and pressure seals the seams and prevents moisture from passing through. Thus, taped seams keep you dryer and warmer." – Trespass Team
This quote perfectly sums up the essence of seam taping. By sticking to time-tested methods – using the right materials, ensuring clean surfaces, maintaining controlled conditions, and applying consistent pressure – you can achieve durable, waterproof seams for any scale of production.
FAQs
What’s the difference between fully taped and critically taped seams in jackets?
Fully taped seams ensure complete waterproofing by sealing every seam on a jacket, including key areas like the hood, shoulders, and cuffs. This design provides maximum defense against water, making these jackets perfect for harsh weather or extended exposure to rain. On the other hand, critically taped seams focus on sealing only the most vulnerable areas, such as the hood and shoulders. While this offers decent protection in moderate conditions, it’s less effective during heavy downpours.
Jackets with fully taped seams are typically pricier and a bit bulkier due to the extra materials and craftsmanship involved. In contrast, critically taped jackets are lighter, more flexible, and usually more budget-friendly, making them an excellent choice for casual outdoor activities or sports that demand greater mobility.
How do I select the right seam tape for my jacket’s fabric type?
Choosing the right seam tape starts with understanding your jacket’s fabric coating or laminate. Common fabric types include 2-layer PU-coated nylon, 3-layer laminated membranes (like Gore-Tex), and neoprene or heavily coated fabrics. Once you’ve identified the fabric, select the corresponding tape: 2-layer PU tape works for PU-coated fabrics, 3-layer tape is ideal for laminated membranes, and specialty tapes are best for neoprene or DWR-treated surfaces.
Pay attention to the tape’s width and thickness, as these should match your fabric’s weight. Lightweight fabrics pair well with thinner tapes, about 0.05 mm, while heavier fabrics may require thicker options, up to 0.20 mm. Temperature settings are also key – use 176°F for 2-layer PU tape and 257°F for 3-layer tape. For the best results, choose tapes recommended by the fabric manufacturer, as they’re designed to offer strong adhesion and long-lasting durability. Following these guidelines will help you achieve waterproof seams without compromising the fabric’s breathability.
What are common problems with seam taping on jackets, and how can you fix them?
Seam taping problems often stem from adhesion failures or incomplete coverage. Over time, factors like frequent washing or wear and tear can cause the tape to lift, allowing water to seep in. Using the wrong tape – like applying PU tape on a PTFE-coated membrane – can also lead to poor bonding. Tight or curved areas can be especially tricky, as they may result in gaps or air bubbles, creating weak points for leaks.
To address these issues, start by thoroughly cleaning the seam and removing any old residue. Select the appropriate tape for the fabric type – such as PU tape for coated nylon or PTFE tape for laminated membranes – and apply it with a hot iron set to about 300°F. If the tape is lifting, reheat the edges to re-activate the adhesive. For challenging areas, opt for flexible tape and overlap the edges by at least 1/2 inch to ensure a secure seal. Once applied, press the tape firmly and allow it to cool under pressure for a few minutes. Finally, test the seam by spraying water to confirm it’s fully watertight.