
When designing activewear, trims – like zippers, elastics, and logos – are just as critical as fabric. Poorly documented trims can lead to production errors, customer dissatisfaction, and wasted resources. To avoid these issues, your tech pack must include:
- Trim Names & Sources: Specify exact names, suppliers, costs, and quantities (e.g., "YKK #5 Vislon Zipper, black, $0.50/unit").
- Material & Performance: Detail compositions (e.g., "100% nylon coil") and durability standards (e.g., "withstands 30 washes").
- Color, Finish & Size: Use precise specs like Pantone codes, finishes (matte/glossy), and tolerances (e.g., "8 inches ±0.125").
- Placement & Attachment: Provide CAD sketches and clear instructions for positioning and stitching methods.
Factories rely heavily on these details to source and assemble trims correctly. Missing or vague information can cause delays, mismatches, or quality issues – especially in U.S.–China production. Ensure your tech pack is thorough, updated, and includes visuals to minimize errors and streamline manufacturing.
Fashion Design Tech Pack: What Do I Put in it?
Required Trim Details for Tech Packs

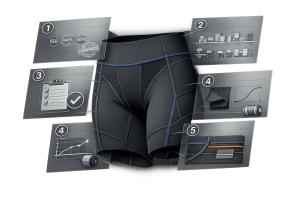
Essential Trim Details Required in Tech Packs for Activewear Production
When it comes to creating tech packs, getting the trim details right is non-negotiable. These specifics are the backbone of a smooth production process, ensuring accuracy, avoiding costly mistakes, and keeping budgets on track. Each trim entry in your tech pack should cover four essential areas. Leaving out even one can lead to extra sampling rounds or trims that fail to meet your standards.
Trim Name, Type, and Sourcing Details
Every trim should be clearly identified by its exact name – think "YKK #5 Vislon Zipper" or "10 in. reverse coil zipper, #5, black." Alongside this, include the supplier’s name, reference number, unit price (in U.S. dollars), and the quantity needed. This level of detail ensures accurate budgeting and avoids unexpected costs. If your factory is sourcing trims locally, make sure to update the tech pack once the factory confirms the supplier and product details. Since factories often handle trim orders for brands, providing this information upfront reduces confusion and minimizes sourcing errors.
Material Composition and Performance Requirements
Be specific about the material composition, like "100% nylon coil with polyester tape", and list performance criteria such as "minimum 90% stretch recovery" or "water resistance." Include weight measurements in ounces per yard and define durability needs, such as "50,000 abrasion cycles." For trims that come into contact with skin – like elastics for waistbands or underbust bands – note certifications like OEKO-TEX Standard 100 or bluesign to ensure safety and compliance with U.S. retail regulations. If the trims come in multiple colors, break down the specs by colorway to avoid mismatches during production.
Color, Finish, and Size Specifications
Provide exact color details, such as Pantone codes, and specify the finish – whether it’s matte, glossy, or otherwise. Include precise dimensions, like "8 inches ±0.125 inches", using imperial units, and define acceptable tolerances, such as "1 inch width ±5%." To prevent dyeing errors, especially in multi-colorway collections, reference physical swatches or digital color approvals in addition to these specs.
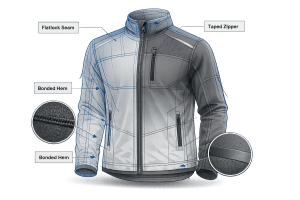
Placement and Attachment Methods
Placement and attachment instructions should leave no room for interpretation. Use CAD sketches with callouts to show exactly where each trim belongs. For instance: "Zipper centered on center front, top stop 0.5 inches below collar seam, teeth facing inward." Specify attachment methods clearly, whether it’s a double-needle topstitch with 10–12 stitches per inch, ultrasonic bonding, or heat-seal application for trims like reflective tapes. Include detailed CAD sketches that reference the BOM (Bill of Materials) for added clarity. This combination of visuals and precise instructions can significantly reduce sampling errors, which account for 20–30% of production issues caused by vague specifications.
How to Document Common Activewear Trims
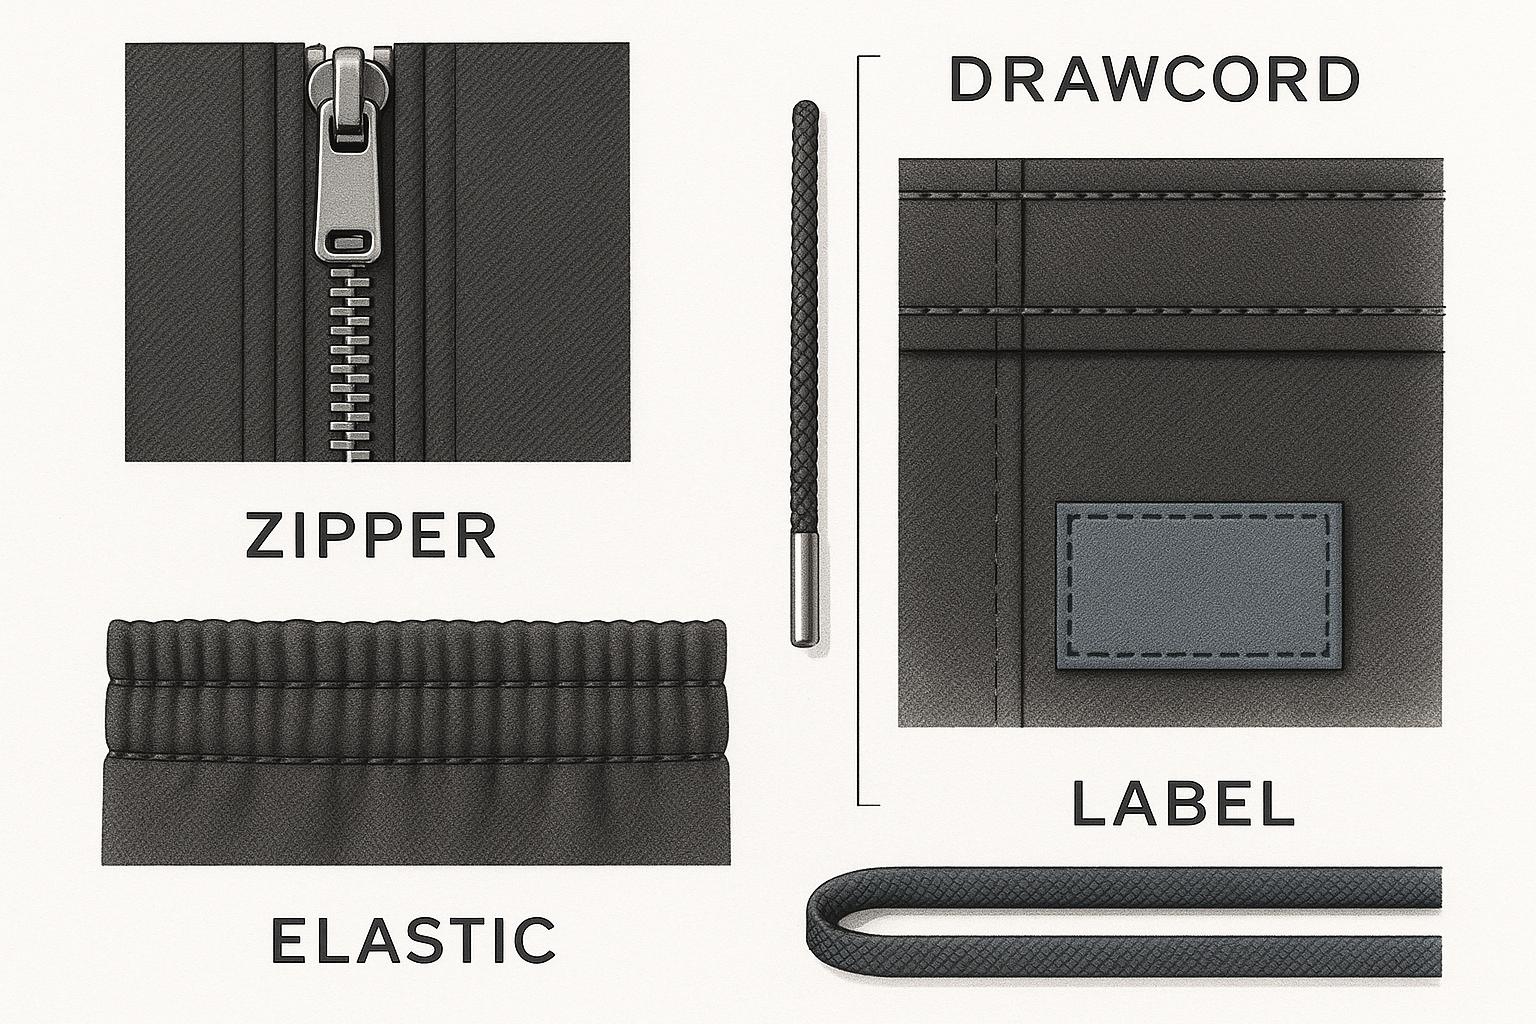
Getting the details right when documenting trims is essential to avoid production hiccups and ensure top-notch activewear. Trims play a big role in both how the garment performs and how it looks. For activewear, the main trim categories – zippers, elastics (including drawcords and adjusters), and branding elements – all need precise specifications to keep production on track.
Zippers and Zipper Components
Start by identifying the type of zipper you’re using: coil, metal, or invisible. For activewear, coil zippers are the go-to choice because they’re flexible and durable. Include the gauge number (#5 is common for medium-duty jackets and hoodies), the slider style (such as auto-lock, pin-lock, or reversible), and the exact length in inches (e.g., 10 inches for a jacket front).
Don’t forget to detail any extras, like zipper garages, noting their placement (e.g., 0.5 inches above the top stop). If your design includes storm flaps or protective shields, specify how they’re attached and their dimensions. Be sure to include the Pantone color code (e.g., 19-4006 for black) and the material composition (e.g., "nylon coil with polyester tape") to avoid any color or material mismatches.
Elastics, Drawcords, and Adjusters
After zippers, it’s time to focus on elastics and related components. For elastics, document the width (e.g., 1 inch for waistbands), stretch properties (e.g., 80% stretch with 95% recovery after five cycles), and material composition (e.g., 70% polyester/30% spandex). Also, specify the attachment method, like a zigzag stitch placed 0.25 inches from the edge. For elastics that touch the skin, reference ASTM D4964 standards and include durability requirements, such as withstanding 200 wash cycles without losing performance.
When it comes to drawcords, note the material (e.g., flat polyester tape or round braided options), the length for each size (e.g., 24 inches for small and 28 inches for extra-large, measured end-to-end), and how the ends are finished (e.g., with aglets, knotted tips, or metal ferrules). Include pull strength requirements (e.g., at least 50 lbs) and routing details, like passing through a 1-inch casing at the waist, with tolerances of ±0.5 inches to account for slight production differences.
For adjusters, specify the type (e.g., plastic cord locks, metal ladder locks, or toggle adjusters), their function (e.g., one-way lock for hoods), and their size (e.g., 1-inch width for a 0.5-inch drawcord). Include the material (e.g., POM plastic or anodized aluminum for corrosion resistance), the weight per piece (ideally under 5 grams), and the testing requirements (e.g., 20 lb pull force for running jackets). Add sketches to highlight stitching details, like bar-tack placements, to ensure the adjusters are securely attached.
Logos, Labels, and Heat Transfers
Branding elements need to be just as detailed. Always provide artwork files in vector format (AI or PDF at 300 DPI or higher). Specify placement coordinates with tolerances and size (e.g., 2 inches below the collar center, ±0.125 inches, with a chest logo size of 3 x 1.5 inches). Include the material (e.g., silicone for heat transfers or woven satin for labels) and the application method.
For heat transfers, document the key application settings: temperature (e.g., 320°F), pressure (e.g., 5–10 psi), and duration (e.g., 15 seconds). Add performance requirements, such as adhesion after 40 washes (per AATCC 61 standards) and no cracking at 20% stretch. For woven labels, specify the stitch type (e.g., double-needle with 10–12 stitches per inch) and confirm care instructions through wash testing (e.g., 50 wash cycles).
Lastly, make sure your BOM (Bill of Materials) lists colorways separately, includes supplier information, and has approval proofs to prevent any color mismatches that could slow down production. With this level of detail, your trim documentation will help ensure smooth and error-free manufacturing.
sbb-itb-8dbc09a
Working with China-Based Manufacturers on Trim Specifications
When collaborating with factories in China, clear communication is essential – especially when it comes to language, measurement systems, and sourcing practices. Many factories rely on locally sourced trims or in-house stock, so it’s a good idea to initially mark trim references as "to be determined" (TBD). Once the factory provides their article numbers, update the documentation to avoid delays and ensure both sides are aligned on sourcing.
Using Visuals to Support Trim Specifications
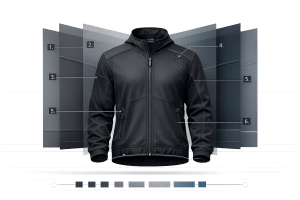
Visuals can be a game-changer in bridging communication gaps and minimizing production errors. Include flat sketches that clearly show all trim placements, with numbered callouts that tie directly to your trim table (e.g., "#03: 8-inch CF coil zipper, auto-lock puller, reverse coil, hidden tape"). For more intricate details, use close-up visuals with arrows to show exact distances from seams, hems, or edges (e.g., "logo 3/4 inch above hem, centered to center front").
High-resolution photos of approved samples are another helpful tool. Label these images with figure numbers (e.g., "Fig. A – Waistband elastic finish") and reference them in your construction notes and Bill of Materials (BOM). When sharing photos, be sure to specify whether the image is "for reference only" or "must match", so the factory knows whether to replicate the design exactly or use it as inspiration. Adding clear English labels, along with simple visual markers like arrows, circles, or shading, ensures the factory interprets your instructions accurately.
Measurement Units, MOQs, and Lead Times
Always declare a primary measurement system in your tech pack and BOM (e.g., "All dimensions in mm unless noted"). For critical trims, it’s helpful to provide both imperial and metric measurements (e.g., 1/4 inch / 6 mm). Clarify how each trim should be measured – such as zipper length between stops, logo size by height, or elastic length in a relaxed state – and include a note or diagram if needed for clarity.
Be sure to confirm the minimum order quantity (MOQ) for each trim and color, as Chinese suppliers often set separate MOQs for different colors or sizes. Clearly indicate whether a trim is "standard stock" (lower MOQ, faster lead time) or "custom" (higher MOQ, longer lead time) in your tech pack and BOM. This helps align production planning with the factory’s capabilities.
Lead times for trims from Chinese vendors vary. Standard in-stock items usually take 1–2 weeks, while custom-dyed or molded trims can take 4–8 weeks. Factor these timelines into your production schedule by setting target dates for trim selection, lab dips, and final approvals before bulk orders. For performance activewear, add extra time for testing – such as colorfastness, stretch recovery, and wash durability – and plan for an additional sample round to focus on trims and finishes. These steps help ensure everything runs smoothly.
How New Dong Huang Garment Co., Ltd. Supports Trim Sourcing
New Dong Huang Garment Co., Ltd., with 27 years of experience in activewear manufacturing, offers valuable support in trim sourcing. They work with trusted suppliers to recommend components like zippers, elastics, and heat transfers that are ideal for yoga, running, and outdoor apparel. Their team also helps verify trim performance by coordinating lab tests and trial runs during sampling. This ensures key elements – like waistband elastic stretch and recovery, reflective logo durability against sweat and washing, and zipper tape strength – meet your expectations.
To make the most of their support, provide clear performance requirements (e.g., wash cycles, sweat resistance, temperature ranges), reference garments, and any brand-standard trims you already use. With this information, New Dong Huang Garment Co., Ltd. can suggest locally available alternatives that meet your specifications, fit MOQ requirements, and align with your lead time and budget for U.S.–China activewear production.
Conclusion: Trim Documentation Best Practices
Clear and detailed trim documentation is the backbone of successful activewear production, particularly when collaborating across borders. Including specific details like trim names, material composition, color references, sizes with tolerances, and placement instructions in your tech pack removes any uncertainty for the factory. This level of precision not only reduces the need for multiple sampling rounds but also cuts down on costly rework and helps you stick to your production schedule. In short, it keeps the entire process running smoothly.
To ensure your trim specifications are foolproof, ask yourself this: Could someone unfamiliar with the project execute every trim detail based on this document alone? If the answer is no, it’s time to fill in the gaps. Add missing measurements, supplier codes, or visual callouts. Use numbered annotations that correspond to the BOM and include close-up photos or diagrams for tricky areas like waistbands, zippers, or logo placements. These small additions can make a big difference in avoiding confusion and errors.
Keep your documentation organized by maintaining version control and storing all files in a centralized location. Assign a specific owner to oversee tech pack revisions, ensuring that everyone – from your design team to the manufacturer – is working off the most up-to-date information. Adopting consistent file naming conventions (e.g., "Legging_Style201_TechPack_v3") is another simple yet effective way to avoid miscommunication and outdated specs sneaking into production.
For added assurance, consider partnering with experts like New Dong Huang Garment Co., Ltd. Their 27+ years of experience in activewear manufacturing, combined with compliance with international standards such as BSCI, Sedex, and GRS, ensures rigorous quality control and a 99% on-time delivery rate. Their team can help you fine-tune your tech pack, recommend trims that meet performance demands, and flag any unclear or missing details before you even reach the sampling stage.
FAQs
What are the most common mistakes when adding trims to a tech pack?
One frequent mistake in documenting trims within a tech pack is leaving out crucial details or providing vague information. For instance, omitting specifics like material type, exact dimensions, or placement can create unnecessary confusion during production. It’s equally important to include color codes, attachment methods, and any special features to maintain clarity and consistency.
Another common issue arises when trim details are not updated after design changes. Outdated or conflicting information can easily lead to production errors. To prevent this, make sure to include clear sketches or images of the trims, paired with accurate measurements and the latest specifications. These practices help streamline the production process and reduce the risk of mistakes.
What steps should I take to ensure trims in activewear meet performance standards?
When selecting trims for activewear, it’s crucial to prioritize durable, high-quality materials that can handle frequent washing, stretching, and daily wear. Opt for trims that offer added technical benefits like moisture-wicking, anti-odor properties, or UV protection to boost the garment’s overall functionality.
Thorough testing is a must – evaluate trims for durability, colorfastness, and performance reliability in conditions that mimic real-world use. Collaborating with certified, experienced suppliers ensures trims meet industry standards and align with the quality your product demands.
Why is it essential to specify the exact color and size of trims in a tech pack?
Providing precise details about the color and size of trims in a tech pack is essential to bring your design vision to life. These specifics enable manufacturers to match trims accurately, reduce production mistakes, and ensure consistent quality across every piece.
By outlining these details clearly, you also simplify communication with suppliers. This ensures trims are correctly positioned and proportioned, saving both time and money by avoiding unnecessary revisions during production.