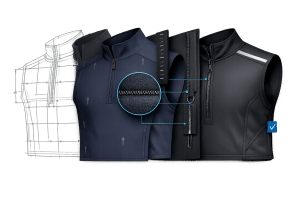

Evaluating the first samples from factories is a critical step in ensuring your designs translate into high-quality, production-ready garments. These samples, often called prototypes, help identify potential issues in fit, construction, and performance before mass production begins. Here’s a quick overview of the process:
- Why It Matters: Catching and fixing design or construction flaws during sampling is far cheaper than addressing them during production.
- Key Areas to Assess:
- Fit: Does the garment align with your size chart and meet functional needs?
- Construction: Are seams, stitching, and finishing up to standard?
- Material Performance: Does the fabric stretch, breathe, and move as intended?
- Tools You’ll Need: Flexible tape measure, fit model or dress form, Pantone guides for color matching, and fabric testing kits.
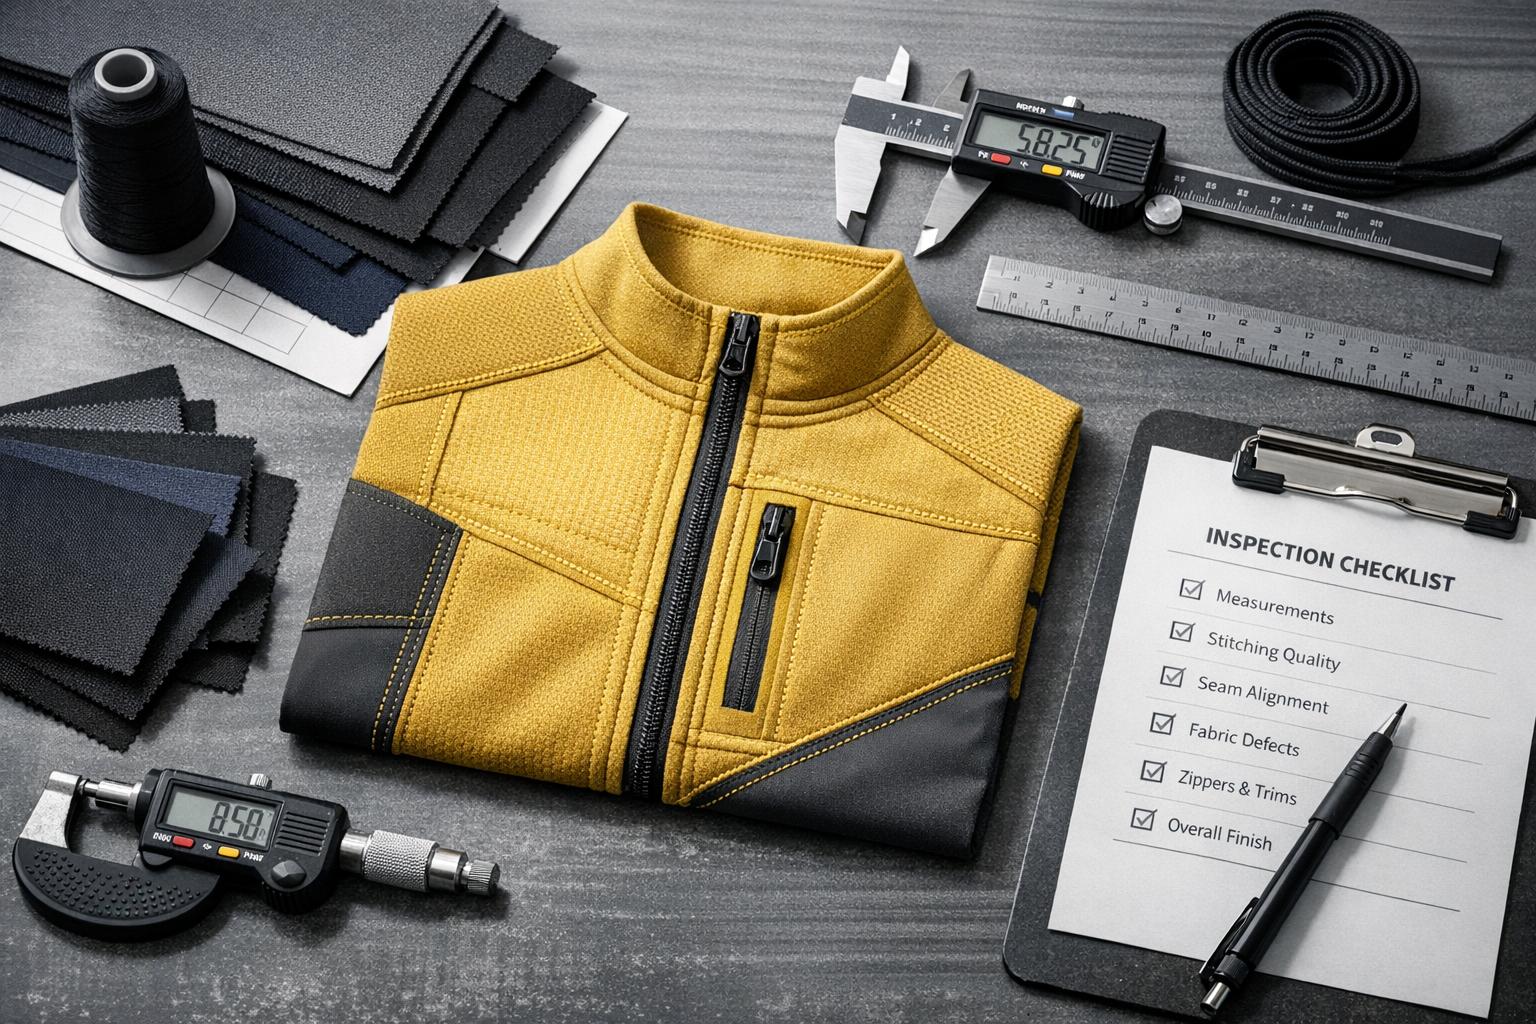
- Checklist Essentials: Measurements, construction quality, trims, labels, and compliance with safety standards like flammability and chemical testing.
- Testing Fit and Movement: Use live models to test static fit and real-world movements like squats or stretches.
- Fabric Durability Tests: Shrinkage, colorfastness, pilling, and stretch recovery are common tests.
- Final Step: Approve a "Golden Sample" or "Red Tag Sample" as the production benchmark.
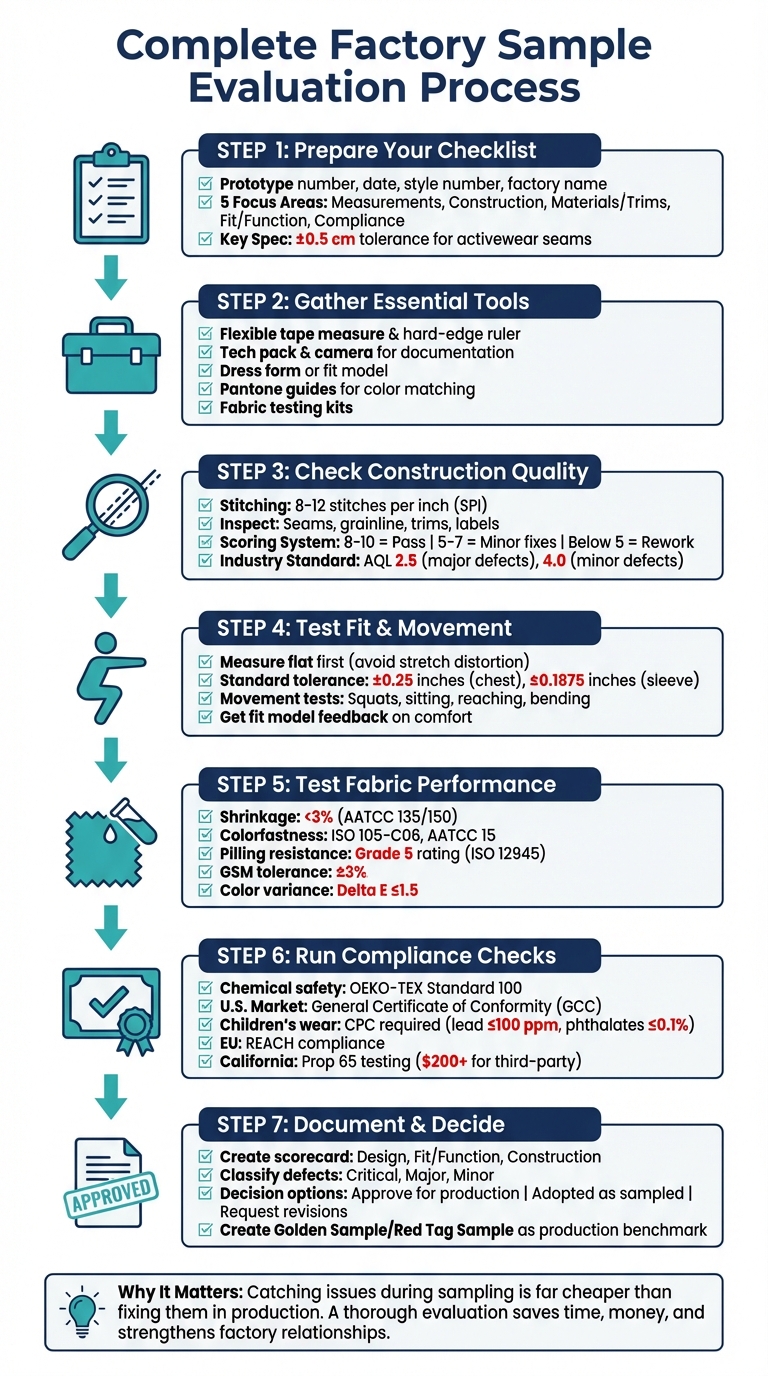
Complete Factory Sample Evaluation Process: 7-Step Quality Control Checklist
How to Review Your First Prototype Sample + a SPOILER
Creating Your Sample Evaluation Checklist
Before your sample arrives, it’s crucial to have a checklist ready to ensure every detail is accounted for. Start with an administrative header that includes key information like the prototype number (e.g., P1, P2), date, style number, and factory name. This makes it easier to track changes and iterations over time. Think of this checklist as the backbone of your evaluation process – it keeps everything organized and consistent.
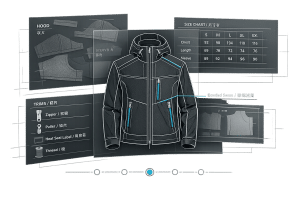
Your checklist should focus on five main areas: measurement specifications (all Points of Measure from your tech pack), construction quality (stitch type, seam allowances, and finishing), material and trim verification (fabric weight, color matching, zipper functionality), fit and functionality (stress points and range of motion), and compliance and safety (such as meeting flammability regulations). As Belinda Jacobs from Techpacks.co explains:
"A tech pack is essentially a blueprint created by your designer, with instructions for the manufacturer to use during production".
What to Include in Your Checklist
Make sure to list every Point of Measure (POM) from your tech pack, along with the tolerances – the acceptable range for each measurement. For instance, in activewear, seam quality tolerances are typically around ±0.5 cm (about ±0.2 inches). To illustrate, if your chest width spec is 18 inches with a ±0.25-inch tolerance, any measurement between 17.75 and 18.25 inches is acceptable. Anything outside that range fails. This clear pass/fail system eliminates ambiguity during evaluations.
For activewear specifically, include tests tailored to the fabric, such as shrinkage (less than 3%), colorfastness to perspiration, and resistance to pilling. Pay close attention to specialized stitches like flatlock, ISO 401 chainstitch, and coverstitch, ensuring they provide both strength and comfort. Inspect high-stress areas for secure bartacks, and if your design features graphics, test for screen print adhesion, sublimation clarity, and heat transfer durability.
With your checklist finalized, gather the tools you’ll need to measure and document everything effectively.
Tools and Resources You’ll Need
Having the right tools on hand is essential for enforcing the standards in your checklist. Start with basic measurement tools like a flexible tape measure and a hard-edge ruler. Keep your tech pack nearby and be ready to document any flaws – use a camera for visual records and highlighters or pens to mark specs that fall outside the acceptable range. For fit assessments, use a dress form that matches your brand’s base size or a fit model, along with pins for temporary adjustments.
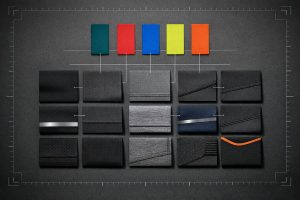
Additional tools can make your review process even more thorough. For instance, Pantone guides or shade bands help with precise color matching, while fabric testing kits let you verify material composition. Use marking tools like fabric chalk to pinpoint areas needing changes. Natalie Smith from Points of Measure emphasizes:
"Measurements in red represent measurements out of tolerance and revised measures".
Finally, always measure garments flat before testing their fit on a form or model. Stretching can distort measurements and lead to inaccurate results.
Checking Visual Appearance and Construction Quality
Once measurements are verified, the next step is to assess the garment’s construction quality. Start by inspecting both sides of the piece for raw edges or poorly finished seams. Pay close attention to the stitching – it should be clean and consistent, typically falling between 8–12 stitches per inch (SPI). As FittDesign Studio highlights:
"A well-constructed garment will have at least 8–12 stitches per inch (SPI). This is a good indicator of durability, especially in high-stress areas like seams."
Stretch the seams gently to check for thread breakage or slippage, and confirm that seam allowances adhere to the tech pack specifications. These allowances should be neatly finished to avoid fraying. Also, check the grainline – it should run vertically on the body and horizontally on the sleeves. Misaligned grainlines can lead to twisting or uneven stretching over time.
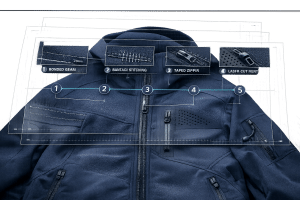
Don’t overlook trims and hardware. Zippers should glide smoothly, buttons and snaps must be firmly attached, and drawstrings should stay in place. Labels should be correctly positioned, legible, and accurate. Every detail should align with the standards outlined in your tech pack. This initial inspection sets the stage for a more detailed evaluation using defined quality criteria.
Construction Features to Examine
When evaluating construction, focus on the following aspects that impact durability and finish:
- Stitching Quality: Look for skipped stitches, loose threads, puckering, or uneven topstitching.
- Seam Construction: Test the seams by stretching the fabric both horizontally and vertically to ensure they hold up under stress.
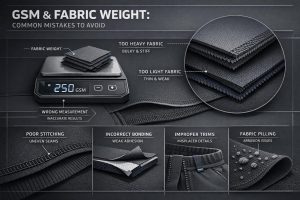
- Fabric Characteristics: Ensure the fabric matches approved shade bands, maintains consistent weight (GSM), and is free from stains, holes, or pilling.
- Trims and Hardware: Verify that zippers, buttons, and drawstrings function smoothly without snagging or breaking.
- Labels and Branding: Check that labels are properly aligned, legible, and accurate.
- Decorations and Embellishments: Inspect prints and embroidery for precise alignment and intact edges.
Designer Heidi from Sew Heidi underscores the importance of being thorough during this stage:
"There’s no quality issue too small, this is your chance to prevent any defects from arising during bulk production."
Document any defects you find with clear photos, adding arrows or text annotations to make feedback unmistakable for the factory.
Using a Scoring System for Construction Quality
To evaluate construction quality consistently across multiple samples, consider using a scoring system. Rate each element on a scale from 1 to 10. Scores between 8 and 10 indicate a pass, 5 to 7 suggest minor corrections are needed, and anything below 5 requires rework. For example, if stitching density measures 10 SPI with even tension and no skipped stitches, it might score a 9. However, if puckering or loose threads are present, it could score a 4, prompting a rework request.
Apply this scoring method to all key elements – stitching, seams, fabric quality, trims, labels, and decorations. This approach creates an objective record that simplifies communication with the factory. In professional sportswear quality control, Acceptable Quality Limits (AQL) are often set at 2.5 for major defects and 4.0 for minor defects, providing a reliable industry benchmark.
Testing Fit and Movement
Before diving into how a garment fits and moves, it’s crucial to confirm its construction quality and take accurate flat measurements. Lay the garment flat and compare it to your tech pack specifications. This avoids any distortion caused by stretching during fitting. As Natalie Smith from Points of Measure explains:
"It’s important to measure your garment first before fitting it because fitting your garment can stretch the fabric. It’s best to evaluate the garment exactly as the factory delivered it to you."
Once you’ve documented these flat measurements, the next step is selecting the right fit model. Choose someone whose body proportions align with your brand’s target size chart rather than relying on a generic "standard" size. A live model is essential for this process, as dress forms simply cannot replicate the subtleties of human contours or movement. Designer Heidi from Sew Heidi underscores this:
"A dress form can never replicate a human body perfectly and doesn’t move."
Now, with your fit model ready, it’s time to assess the garment’s critical measurements.
Taking Fit Measurements
When the garment is on your fit model, focus on key points of measurement (POMs) such as shoulders, bust or chest, waist, hips, sleeve length, bicep, and cuff openings. Examine the garment from all angles to catch any pattern distortions or stress areas. Keep in mind that small variances are common in manufacturing – industry standards often allow for tolerances of ±0.25 inches for measurements like chest width and ±0.1875 inches for sleeve width.
If the garment feels tight but matches the measurement specs, the issue might lie in the pattern itself. For instance, a shallow crotch curve can cause discomfort even if the overall measurement is technically correct. Use pins to mark areas needing adjustments, creating a clear reference for design refinements. Take annotated photos from all angles to document your findings. This static evaluation sets the foundation for the next step: movement testing.
Running Movement Tests
Static measurements alone won’t reveal how a garment performs in motion. That’s where movement tests come in. These tests simulate real-life activities to uncover issues that aren’t apparent when the model is standing still. Have your fit model perform actions like squatting, sitting, walking, reaching overhead, and bending forward. These motions highlight potential problems such as waistband rolling, fabric transparency, or restricted mobility.
For activewear, specific tests like squats are particularly important. As Heidi notes:
"If you’re evaluating activewear leggings, you can ask your fit model to do a quick squat to check the garment’s performance."
This test helps identify fabric transparency, seam durability, and whether the waistband stays in place. For tops and jackets, have the model perform arm circles or overhead stretches to check for tightness in the back, armholes, or sleeves. Elastic bands and straps should also be tested – stretch them fully to ensure they don’t break or lose stitching integrity.
Finally, gather direct feedback from your fit model. Ask how the garment feels during movement and whether they notice any pinching, chafing, or restriction. For a deeper understanding, consider a wear test – have the model wear the garment during their daily routine to uncover issues that may not show up during a short fitting session.
sbb-itb-8dbc09a
Testing Fabric Performance and Durability
As we continue our in-depth sample review, it’s time to focus on how well the fabric holds up under pressure – literally and figuratively. After verifying fit and movement, the next step is to test the fabric’s durability and functionality. These tests are crucial to ensure the garment meets your expectations and avoids the hassle of returns.
Fabric Tests to Run
Start with dimensional stability testing. Take a marked fabric square, measure it, and then run it through washing and drying cycles following AATCC 135/150 standards. Ideally, shrinkage should stay below 3%. Another key test is colorfastness. Check how the fabric holds up against washing (ISO 105-C06), perspiration (AATCC 15), light exposure, and crocking (AATCC 8). For activewear, perspiration testing is especially important since sweat can be a major factor in fabric wear and tear.
Next, assess pilling and abrasion resistance using ISO 12945 standards, aiming for a Grade 5 rating (no pilling). Perform a gentle pull test on seams, especially in high-stress areas like pocket corners and side seams, to ensure they don’t break or slip. For garments with logos or prints, test the durability of screen prints by applying 3M adhesive tape, pressing it down firmly, and peeling it off at a 45-degree angle – this ensures the designs are securely adhered.
Another critical test is stretch recovery. Stretch the fabric and check if it returns to its original shape without deformation. Don’t forget to test functional components like zippers and snaps by operating them repeatedly – 20 cycles is a good benchmark.
Lastly, confirm the basics. Verify that the GSM (grams per square meter) matches your tech pack specifications, and ensure the fabric’s handfeel aligns with the approved sample. Check for any unpleasant odors caused by colorants, mold, or chemicals.
Comparing Test Results to Specifications
Once the tests are complete, compare the results against your technical standards. Just as fit and measurements are non-negotiable, fabric performance must also align with your predefined tolerances. For example, GSM and product weight typically allow a tolerance of ±3%, and color variations exceeding Delta E 1.5 are often flagged as out of spec.
Consistency is key, so ensure both you and your manufacturer follow the same testing protocols, whether they’re AATCC or ISO standards. As Heidi from Sew Heidi wisely points out:
"A well-executed sampling process and prototype review saves fashion brands heaps of time and money as it helps catch issues early to avoid costly and irreversible mistakes during mass production".
If needed, you can perform a fabric burn test to confirm the material composition. These steps are all about catching potential problems early, ensuring your final product is ready to impress.
Running Lab and Compliance Checks
After testing your fabric’s performance, the next step is ensuring regulatory compliance. This is essential to avoid potential fines, recalls, or liability issues. As Andy Church, Founder & CEO of Insight Quality Services, emphasizes:
"Failing to comply with regulations can lead to fines, recalls, and safety incidents. So you must first understand the rules that apply to your products and then have them lab tested for compliance and safety".
Required Compliance Tests
Start with chemical safety tests. The OEKO-TEX Standard 100 is widely recognized for evaluating over 100 harmful substances, including azo dyes, formaldehyde, heavy metals, pesticides, and PFAS. You can verify an OEKO-TEX certification through their online Label Check Tool by entering the certification number or scanning the QR code. For U.S. markets, a General Certificate of Conformity (GCC) is required to confirm compliance with federal flammability standards. If you’re producing children’s activewear for ages 12 and under, a Children’s Product Certificate (CPC) is mandatory. This certificate ensures that lead content is ≤100 ppm and phthalates do not exceed 0.1%.
Next, conduct physical safety checks. Perform pull tests on buttons, zippers, and snaps to prevent choking hazards and ensure they function properly. Use metal detectors to catch any needle fragments left from production. For European markets, ensure REACH compliance by documenting the absence of restricted chemicals like azo dyes and nickel. If you’re selling in California, verify compliance with Proposition 65. Third-party testing for this typically starts at $200, with costs increasing based on the number of materials tested.
Recording Approved Samples
Once all compliance tests are completed and passed, formalize the approved sample as your production standard. Create a physical "Red Tag" or "Golden Sample" to serve as the definitive reference for production, ensuring consistency and avoiding deviations. As Heidi from Sew Heidi explains:
"Having a 100% accurate approved sample (sometimes called a red tag sample) gives you leverage to discuss what went wrong and negotiate solutions such as a refund or product recall".
Document measurement tolerances – common examples include ±0.5 inches for most garments and ±0.25 inches for waistbands. Store this approved sample securely and share detailed photos with your factory to ensure everyone uses the same reference. This locked sample acts as your safeguard against production errors.
Recording Findings and Making Decisions
After thorough testing and compliance checks, it’s time to turn your findings into clear, actionable steps. Document these results in a concise, easy-to-follow scorecard.
Using a Scorecard for Overall Evaluation
Create a scorecard that evaluates Design, Fit/Function, and Construction. At the top, include key details like the Prototype number, Date (e.g., 01/17/2026), Style number, and Factory name.
For measurements, compare each dimension against the specifications in your tech pack using the corresponding Points of Measure (POM) codes. Use color coding – such as red – to flag dimensions that fall outside the acceptable tolerance range. Add an "Instructions" section to clarify abbreviations like BTS (Back to Spec), ensuring the factory understands the exact corrections needed. As Natalie Smith, Founder of Points of Measure, explains:
"It’s a delicate balance being clear and being kind. Sometimes it may feel like your comments are too blunt, but adding too much ‘fluff’ in your writing will be confusing."
Classify defects into three categories: Critical, Major, or Minor. Use annotated photos to point out specific issues visually.
Next Steps: Approve or Request Changes
Clearly state the outcome: "Approved for production," "Adopted as sampled," or "Send revised prototype" with detailed corrections. If revisions are needed, provide exact measurements (e.g., "Increase the armhole by 1 inch").
When measurement discrepancies persist, request the factory to include the pattern with the next sample. This helps identify whether the problem lies in the cutting or construction process. Once a sample meets all your standards for design, fit, and construction, label it as your "Golden Sample" or "Red Tag Sample." This approved sample will serve as the quality benchmark for bulk production moving forward.
Conclusion
Creating high-quality apparel starts with a detailed checklist and thorough testing. Evaluating first samples is a critical step in catching problems with fit, construction, or materials early on, helping to avoid expensive production mistakes.
Once the samples meet your standards, the next step is to standardize your approved design. This involves creating a Golden Sample – a finalized, physical prototype that serves as the benchmark for bulk production. This sample ensures consistency across all units and minimizes the risk of returns. As Heidi from Sew Heidi, a seasoned fashion designer, puts it:
"A well-executed sampling process and prototype review saves fashion brands heaps of time and money as it helps catch issues early to avoid costly and irreversible mistakes during mass production".
The benefits go beyond cost savings. A thorough evaluation process also strengthens your relationship with your manufacturing partner. Natalie Smith from Points of Measure emphasizes this point:
"Consistency will keep you sane and help you to develop a positive, lasting relationship with your factory".
Addressing potential issues during the sampling phase is not only more affordable but also speeds up your time-to-market. Early lab testing ensures your garments comply with federal flammability standards and other safety regulations before committing to bulk materials.
FAQs
What is a ‘Golden Sample’ and why is it so important in manufacturing?
A Golden Sample is essentially a prototype created before mass production that showcases the ideal version of your product. It serves as the gold standard for quality, fit, construction, and performance, acting as the reference point for all future production runs.
This sample plays a key role in keeping everyone on the same page – manufacturers, inspectors, and stakeholders alike. By establishing clear expectations early on, it helps avoid production mistakes, inconsistencies, and quality problems, ultimately saving both time and resources during the manufacturing process.
How can I make sure my samples meet U.S. safety standards?
To make sure your samples meet U.S. safety standards, it’s essential to familiarize yourself with the relevant regulations. For apparel, the Consumer Product Safety Commission (CPSC) enforces rules covering flammability, chemical safety, proper labeling, and tracking. All related documentation, such as spec sheets and test reports, should adhere to U.S. conventions, including dollar currency ($), month-day-year dates (e.g., January 16, 2026), and imperial measurements (inches, pounds). This ensures clarity and avoids miscommunication.
Here’s how you can confirm compliance:
- Obtain certified lab test reports from the factory. These should cover flammability, toxic substances, and seam strength before the sample is shipped.
- Inspect the sample upon arrival. Check dimensions, color accuracy, labeling, and overall craftsmanship to ensure they align with your specifications.
- Perform internal tests for stretch, durability, and seam strength using U.S. measurement tools. Keep detailed records of your findings.
By following this approach with New Dong Huang Garment Co., Ltd., you can confidently confirm that your samples meet U.S. safety standards and are ready for bulk production.
What tools do I need to evaluate garment samples effectively?
To accurately evaluate a first garment sample, having the right tools on hand is crucial. Start with the prototype sample and its tech pack, which contains all the design specifications. You’ll need a hard-edge ruler and a tape measure (measuring in inches for U.S. markets) to check dimensions precisely without distorting the fabric. Keep a pen, pencil, and highlighter nearby to mark any deviations or make notes directly on the tech pack or sample.
Place the sample on a clean, flat surface, ensuring it’s free of wrinkles. Measure critical areas like the chest, waist, and inseam, and compare these measurements against the tolerances listed in the tech pack. Use the highlighter to flag discrepancies and jot down observations for the factory. This straightforward approach helps New Dong Huang Garment Co., Ltd. quickly pinpoint and resolve fit or construction issues, ensuring production stays on schedule.